Sunday, August 19, 2012

then and now

i've been wanting to get an updated family picture for a couple of weeks now....and we just can't seem to find the time to get one taken.  well as i was sitting in church today, i was determined we were going to do it this afternoon.

i set up the camera in the back yard and hauled in both kids (the big one and the little one), which took some time because they both wanted to do their own thing. :)

i tried to get one in the same pose we had just one year before, and while it isn't exactly the same...it is close and i'm happy with it!


then
july 2011


now
august 2012


i hope to continue the tradition of taking this picture for the next couple of years! :)

Wednesday, August 15, 2012

jewelry time

man...it has been a long time since i've been on here. i started school last wednesday! i have some awesome and crazy students this year! they are great!

here is our class website... www.mrshamlin.weebly.com

this past saturday, i had the opportunity to go to a vendor fair and sell some of the jewelry i make.  it was a great experience and i did pretty well.

i also had a lady approach me about maybe putting some of my jewelry in her store. i am pretty excited to see how it will do.

here are a couple of the pieces that i have left over from the fair.  i am working on putting them all on etsy now...it just takes a while...ok not really. it takes FOREVER!

here is my etsy site... www.etsy.com/shop/shoppeglitter


i put some up last night and then got tired. hopefully i can get more up this evening after the monster goes to bed.
speaking of the monster...

check out this video i took of him earlier. i can't get him from climbing on things.  i am soooo surprised he hasn't had a broken bone yet.


but i guess that is a boy for ya!

have a great week!

Monday, July 30, 2012

ready for school...not yet!

so i've spent the majority of my morning going through the 275 pins i have on my teaching board! i went through every one of them and printed out all of the things that i want to use this year in my classroom.

if it was a poster then i copied it into Word so i can make it!

talk about a BIG job! it took me about two hours to go through them.  now on to making all of the stuff!

wish me luck!

Tuesday, July 24, 2012

aprons

i've been spending all of my spare time on little girl aprons for the past two weeks. :)

click here to see the link i found the apron at....i didn't follow all of the directions she gave, i changed a bit as i went along.

i made two of them and completely fell in love so i had to make some more for the vendor fair i am going to in a couple of weeks!

here are the aprons i have made.

can you guess what they are made out of?!?!?


did you guess?

each one is made out of a pot holder and a dish towel...

super easy and i will try to get a tutorial up soon on how to make them!

Cari

Monday, July 23, 2012

update!

i've gotten a lot done today!!

the monster and i went to Michael's (they were having a BIG sale and i want to go back!) :)

we went to my classroom to get some plans done. :) he was a good boy and played with toys while momma worked.

had lunch with a couple of friends....

then i come home and got his baby book up to date while he took a nap!!! (that was a big task!!!)


now i am getting ready to work with these things! can you guess what they are? when i'm finished with them i will post more pictures! :)


i also wanted to share a cool idea i found from pinterest (ha ha...the irony!)

i made it for mason for about two dollars and it keeps him busy for 30-40 mins at a time. :)


all it is, is a cheap colander and a couple of pipe cleaners. :) he LOVED it!

Cari


easy peeezy headband holder

so i saw all of the post on pinterest on how to make a headband holder out of an oatmeal container.  i thought it would be easy enough so i decided to do it today. :) 

instead of an oatmeal container i used an old dishwasher soap one we had. i also saw some people spray painted their container.  i thought scrapbook paper would be so much easier so i decided to use it instead of paint.

these are all the materials i used....

glue gun
dishwasher soap container (or oatmeal container)
two pieces of scrapbook paper


disregard the candle holder! i was going to set my holder on top of it when it was finished (like some of the posts i saw), but i changed my mind.  i liked the way it turned out without it. :)


first i marked the scrapbook paper to the length of the container.


then i glued the scrapbook paper to the container! you need two pieces because one 12 X 12 piece wont fit completely around it.


finally, i added my headbands!!! :)

i even put the stretchy workout ones inside the container because they wouldnt fit on the outside.


it sets perfectly on my dresser!


Cari

Monday, July 16, 2012

monday morning with the monster

so the monster woke up at 7AM this morning instead of his usual 9:30 AM time. so we had no choice but to drink some coffee (and milk for the monster) and enjoy the morning together!


we ate some cereal (he picked out the marshmellows and fed the other pieces to the dogs who were waiting patiently for it)...


(i'm not feeding them my breakfast mom!)


danced to our song.....


 took some pictures...


and

he even helped me feed the dogs!!! :)


happy monday!

Cari

hot glue gun holder

yesterday evening the hubby and i spent some time making a hot glue gun holder. :) i saw the picture on pinterest and immediately told the hubby i had to have one. :) :)  i thought it was going to be an easy project that would take no time, but he had to have everything perfect...even the stain. lol

it took a couple of hours to finish but i think know it will be worth it!!


i took some pictures along the way and jotted down my measurements incase you want to try it. :)


first i traced the main piece and then we (yes WE!:) )cut out the two pieces.

 (i am making two of them)


then we cut out the y's i drew.
(i really just guessed when i drew it, and hoped it worked! and it did!!!
there are three y's because the hubby messed up cutting out the first one)


the one i cut out! :)


this next step isn't necessary, but the hubby thought it would make it look better.

HE rounded all of the edges so it looks nicer.


(i like watching him do the work...he he. i'm a better moderator)


here are the measurements for the box

here i am cutting the pieces out!
i was so nervous to use this thing!!!


he is doing the small pieces....he was scared i was going to chop a finger off.


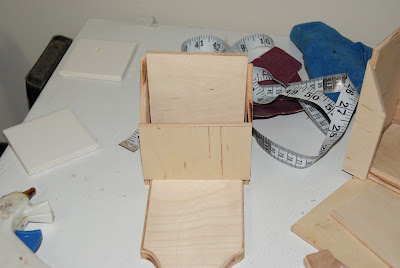
now it's time to put it all together!

i hot glued all of the pieces together.  i was surprised hot glue worked so well on this wood!

glue the y holder on


and the box part is finished!


my first stain job...


i hated waiting for it to dry...


ps. i LOVE my pink crocks!

i waited until this morning to go out and get them. i glued the tile on them and they were FINISHED!!!


love it already!


hope she likes hers as much as i do!!


Cari.